Creating a PHP Image Slideshow: Integrating jQuery and Multiple File Upload

PHP Image Slideshow with jQuery Using Multiple File Upload
Introduction:
In this tutorial, we will learn how to create a PHP Image Slideshow using jQuery and handle multiple file uploads. This process involves uploading images to the server and displaying them dynamically in a slideshow format. Basic knowledge of HTML, CSS, jQuery, and PHP is recommended.
Requirements:
You’ll need a basic understanding of HTML, CSS, jQuery, and PHP.
Set up our HTML file with necessary elements
Create a PHP script to handle file uploads
Create a jQuery script to handle the slideshow functionality
Retrieve the uploaded images from the server using jQuery
Style the slideshow
Implement the slideshow on our website
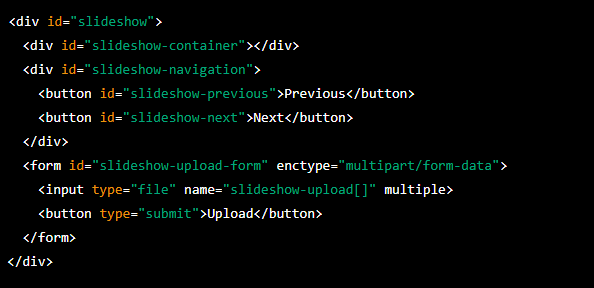
Step 1: Creating HTML Markup
First, we need to create an HTML markup that will display our Image Slideshow. We will create a container div that will hold all the images and a navigation div that will hold the previous and next buttons. We will also create a file input field that will allow us to upload multiple images to the server.
Step 2: Create a PHP script to handle file uploads
Next, we need to create a PHP script to handle file uploads from the form. This script will be responsible for moving the uploaded images to a folder on the server and returning a JSON response with information about the uploaded images. Here’s an example PHP script:
$uploadDir = 'uploads/';
$allowedExtensions = array('jpg', 'jpeg', 'png', 'gif');

if(isset($_FILES['slideshow-upload'])) {
  $uploadedFiles = $_FILES['slideshow-upload'];
  $uploadResults = array();

  foreach($uploadedFiles['name'] as $key => $fileName) {
    $fileExtension = pathinfo($fileName, PATHINFO_EXTENSION);

    if(in_array(strtolower($fileExtension), $allowedExtensions)) {
      $newFileName = uniqid() . '.' . $fileExtension;

      if(move_uploaded_file($uploadedFiles['tmp_name'][$key], $uploadDir . $newFileName)) {
        $uploadResults[] = array(
          'name' => $fileName,
          'newName' => $newFileName,
          'success' => true
        );
      } else {
        $uploadResults[] = array(
          'name' => $fileName,
          'newName' => '',
          'success' => false
        );
      }
    } else {
      $uploadResults[] = array(
        'name' => $fileName,
        'newName' => '',
        'success' => false
      );
    }
  }

  header('Content-Type: application/json');
  echo json_encode($uploadResults);
}
This script sets a directory for uploads, an array of allowed file extensions, and checks each uploaded file to ensure it has a valid extension. If the file is valid, it is given a unique name and moved to the uploads directory. The script returns a JSON response with information about each uploaded file, including the original name, the new name, and whether the upload was successful or not.
Step 3: Create a jQuery script to handle the slideshow functionality
Now, we need to create a jQuery script to handle the slideshow functionality. This script will be responsible for retrieving the uploaded images from the server, displaying them in the slideshow, and allowing the user to navigate between images. Here’s an example jQuery script:
$(document).ready(function() {
  var slideshowImages = [];
  var currentImageIndex = 0;

  // retrieve uploaded images from server
  $.get('get_images.php', function(data) {
    $.each(data, function(index, value) {
      slideshowImages.push(value.newName);
    });

    if(slideshowImages.length > 0) {
      $('#slideshow-container').css('background-image', 'url(' + slideshowImages[0] + ')');
    }
  });

  // handle previous button click
  $('#slideshow-previous').on('click', function() {
    if(currentImageIndex > 0) {
      currentImageIndex--;
      $('#slideshow-container').css('background-image', 'url(' + slideshowImages[currentImageIndex] + ')');
    }
  });

  // handle next button click
  $('#slideshow-next').on('click', function() {
    if(currentImageIndex < slideshowImages.length - 1) {
      currentImageIndex++;
      $('#slideshow-container').css('background-image', 'url(' + slideshowImages[currentImageIndex] + ')');
    }
  });
});
This script initializes an empty array for the slideshow images and a variable to keep track of the current image index. It retrieves the uploaded images from the server using a jQuery GET request to a PHP script (get_images.php) and pushes the new names of the images to the slideshowImages array. If there are any images in the array, the first image is displayed in the slideshow container. The script also handles click events for the previous and next buttons, allowing the user to navigate between images by updating the background image of the slideshow container.
Step 4: Retrieve the uploaded images from the server using jQuery
To retrieve the uploaded images from the server, we need to create another PHP script called get_images.php. This script will simply read the contents of the uploads directory and return a JSON response with information about each file. Here's an example get_images.php script:
$uploadDir = 'uploads/';

$images = array_diff(scandir($uploadDir), array('.', '..'));

$imageData = array();

foreach($images as $image) {
  $imageData[] = array(
    'name' => $image,
    'newName' => $image,
    'success' => true
  );
}

header('Content-Type: application/json');
echo json_encode($imageData);
This script reads the contents of the uploads directory and filters out the "." and ".." directories. It then creates an array of image data, including the original name, the new name (which is the same in this case), and whether the upload was successful or not. The script returns a JSON response with the image data.
Step 5: Style the slideshow
Now that we have the slideshow functionality working, we can style it to make it look better on our website. Here's an example CSS file:
#slideshow-container {
  width: 600px;
  height: 400px;
  background-position: center;
  background-repeat: no-repeat;
  background-size: cover;
  margin: 0 auto;
  margin-top: 50px;
  border: 1px solid #ccc;
}

#slideshow-navigation {
  width: 600px;
  margin: 0 auto;
  margin-top: 20px
Step 6: Integrate the PHP and HTML code
Now that we have all the pieces of our image slideshow, we can integrate the PHP and HTML code to display the slideshow on our website. Here's an example HTML file that includes the PHP code and jQuery script:
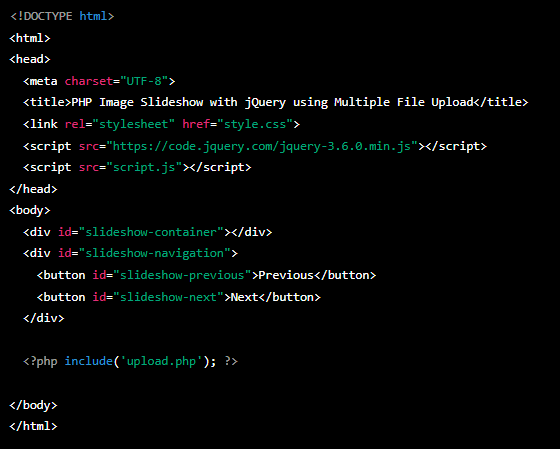
This HTML file includes the necessary CSS and JavaScript files, as well as the slideshow container and navigation buttons. It also includes the PHP code using the include() function to handle the file uploads.