Building an Interactive JavaScript Shopping Cart: Simplify the Checkout Experience with Add to Cart Functionality
JavaScript Shopping Cart Tutorial for E-commerce
Creating a shopping cart for an e-commerce website can be made simple using JavaScript. This JavaScript shopping cart tutorial for e-commerce will guide you through building a functional and user-friendly shopping cart that enhances the checkout process for your customers.
JavaScript Shopping Cart Tutorial for E-commerce: HTML Structure
To begin, create a basic HTML structure for your website. This will include a header, a main content area, and a footer. Within the main content area, create sections for displaying products and the shopping cart contents.
Adding JavaScript to Your E-commerce Shopping Cart
Next, let’s add JavaScript to make your shopping cart functional. This is a key part of our JavaScript shopping cart tutorial for e-commerce websites. You’ll create a function to add items to the cart when the “Add to Cart” button is clicked.
Displaying Your E-commerce Cart Contents with JavaScript
We will now focus on how to display the contents of the shopping cart. This step is crucial in the JavaScript shopping cart tutorial for e-commerce as it enables you to show users the details of the items in their cart.
Calculating the Total Cost in the JavaScript Shopping Cart
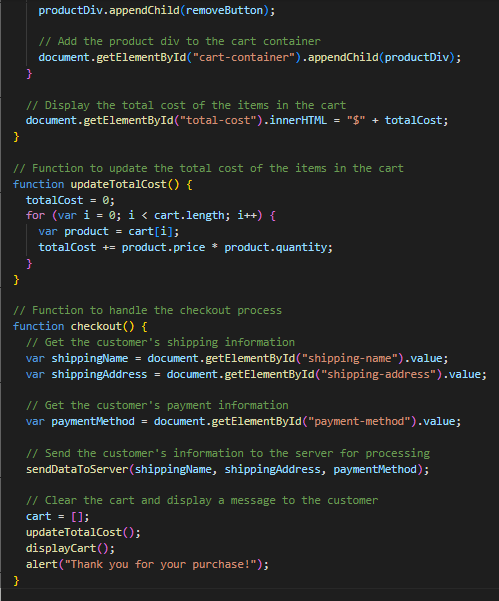
Once the cart items are displayed, we’ll create a function to calculate the total cost. This function will factor in the quantity and price of each item, a vital step in the JavaScript shopping cart tutorial for e-commerce.
Handling the Checkout Process in the JavaScript Shopping Cart
Finally, we need a function to handle the checkout process. This function will gather the customer’s details (shipping address, payment method, etc.) and send the information to the server for processing. This is an essential part of creating an e-commerce shopping cart using JavaScript.
Additional Features to Enhance Your E-commerce Cart
There are many additional features you can implement to improve your shopping cart, such as:
- Displaying the number of items in the cart in the navigation bar
- Adding a “Continue Shopping” button to return to the product page
- Showing the total cost of the cart in real-time
- Saving the cart’s contents in local storage for later use
- Implementing security measures to prevent attacks
JavaScript Example Code for Your E-commerce Cart
Here’s an example of the JavaScript code for creating a basic shopping cart:
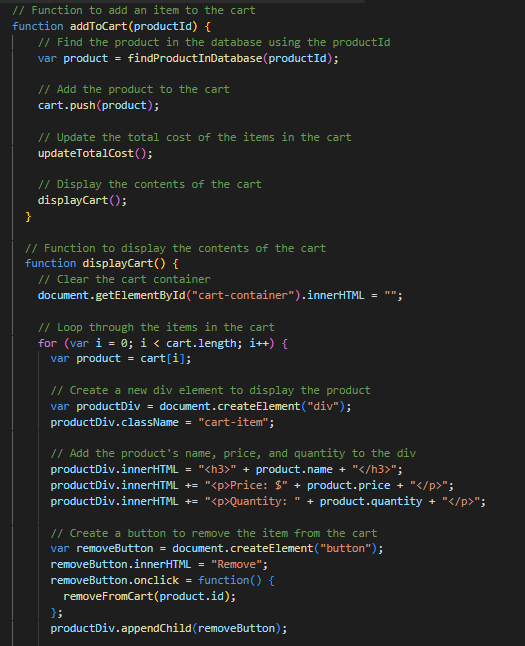
In this example, the `addToCart()` function accepts a product ID, finds the corresponding product in the database, and adds it to the cart.
Styling the Shopping Cart with CSS
After setting up the basic functions, we can enhance the cart’s appearance. Use CSS to modify the layout, add hover effects to buttons, and ensure the cart is visually appealing and user-friendly. You can also use CSS to create a responsive design that adjusts based on the user’s screen size, making the cart accessible across all devices.
Testing Your E-commerce JavaScript Shopping Cart
Once the cart is functional and styled, test it by adding items and going through the checkout process. Try it on different devices and browsers to ensure compatibility. Additionally, tools like Google Analytics can help track user interaction with the cart and provide valuable insights to further improve the experience.
Conclusion
In conclusion, creating a JavaScript shopping cart for your e-commerce website offers a seamless and interactive checkout experience for your customers. By following the steps in this post, you can build a functional and visually appealing shopping cart. With some practice, you can customize it to meet the unique needs of your business.