Streamlining Your Data Management: A Comprehensive Guide to Uploading PHP Files to Server with MySQL Database

PHP File Upload to Server with MySQL Database
To upload a file from a PHP script to a server and save its details in a MySQL database, follow these steps:
First, create an HTML form with a file input field. This allows users to select a file to upload.
Next, use PHP to handle the file upload when the form is submitted. The $_FILES superglobal array contains information about the uploaded file.
Then, move the uploaded file from the temporary directory to a permanent location on the server. Use the move_uploaded_file() function for this step.
Finally, store the file information in a MySQL database. Connect to the database using PHP’s mysqli extension, and execute an SQL INSERT statement to add a new record to the database table.
File uploads are a common feature in web applications. They allow users to upload images, documents, or other files to a server. PHP offers a built-in way to handle file uploads, and MySQL works well as a relational database to store uploaded file details.
In this tutorial, we’ll go through each step in uploading a file from a PHP script to a server and storing its details in a MySQL database. For this tutorial, some knowledge of HTML, PHP, and MySQL will be helpful.
Step 1: Create an HTML Form
Start by creating an HTML form that lets users select a file to upload. This form should include a file input field and a submit button. The file input field enables users to browse their local file system to choose a file, while the submit button triggers the upload.
Here’s an example HTML form:
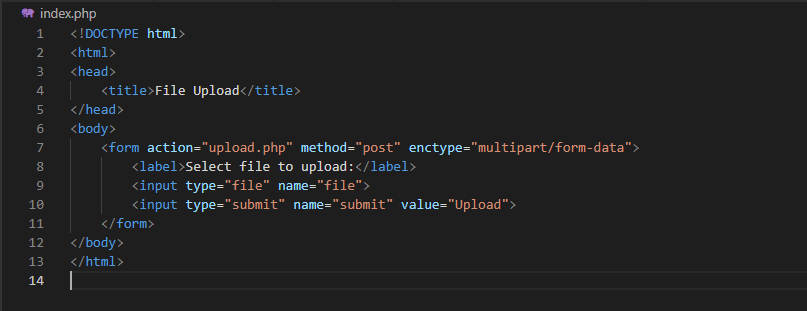
In this example, the form action points to “upload.php,” the PHP script that will handle the upload.
Step 2: Handle the File Upload with PHP
Once the form is submitted, a PHP script will manage the file upload. The script should verify that the file uploaded successfully, move it to a permanent server location, and store its information in a MySQL database.
Here’s an example PHP script:
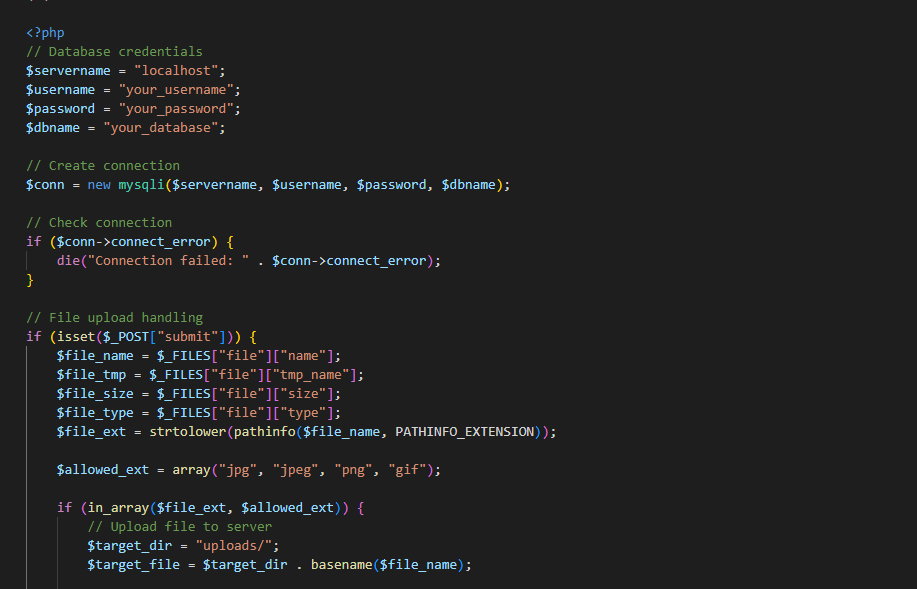
In this example, the script starts by defining database credentials and creating a connection to MySQL. Then, it handles the upload by checking if the form was submitted and retrieves file information using the $_FILES superglobal.
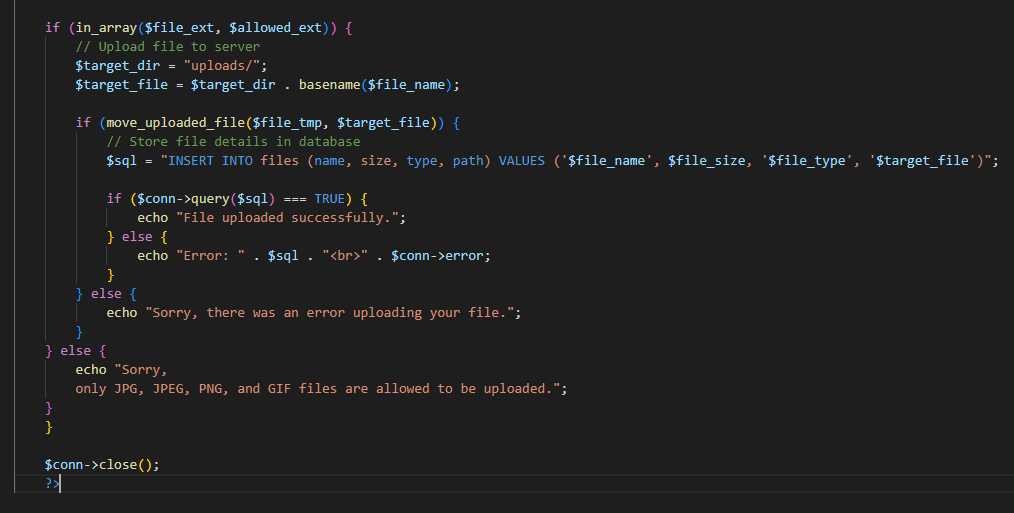
Next, the script verifies if the file has an allowed extension (JPG, JPEG, PNG, or GIF). If valid, it moves the file to a permanent server location and stores its details in the MySQL database using an SQL INSERT statement.
Step 3: Create a Database Table
Before the PHP script can save file details in the MySQL database, create a table to store this information. The table should have columns for the file name, size, type, and path.
Here’s an example SQL query to create the table:
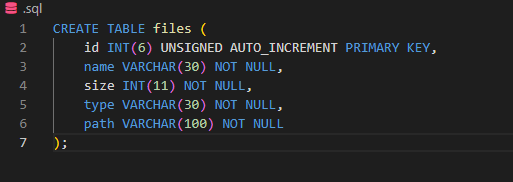
This query creates a table named “files” with columns for the file name, size, type, and path. The id column serves as an auto-incrementing primary key, giving each row a unique value.
Step 4: Test the File Upload
Now that the HTML form, PHP script, and MySQL table are set up, test the file upload by selecting a file and submitting the form. If everything works correctly, a success message should appear.
After uploading the file, confirm that its details were saved in the MySQL database by running a SELECT query on the “files” table:
SELECT * FROM files;
This query will display all uploaded files and their details.
Conclusion
In this tutorial, we demonstrated how to upload files from a PHP script to a server and store their details in a MySQL database. By following these steps, you can add a file upload feature to your web application.
Keep in mind, this is a basic example. Depending on your application’s requirements, you may need to add extra features, such as limiting file sizes, sanitizing inputs to prevent SQL injection, or implementing file validation (e.g., minimum resolution for images).